First thing first, below are some files which you would need in order to setup your own SP2013 Environment. VMware Workstation 9 – here SharePoint 2013 – here SQL 2012 – here Windows 2012 Server – here Visual Studio 2012 – here Here we go.
VMWare Workstation
- Install VMWare Workstation on to your local PC, Ensure that your local PC has got at least 8 gb RAM. You would need to allocate some of the RAM to your 2012 server later.
- Once completed the Workstation installation (i would not go through how you install software as it is simple), create a “New virtual machine“, choose Typical installation, PLEASE select option “I will install the operating system later“, else you will encounter error later. Then click Next until the vm files are created in your document folder “Documents\Virtual Machines\Windows Server 2012”
- Before powering up your vm, please map your Windows Server 2012 ISO file to boot up and install.
Windows Server 2012
- There is nothing much crucial to explain here. Just follow the setup wizard.
- Once completed, you will be asked to enter the administrator password bla bla bla.
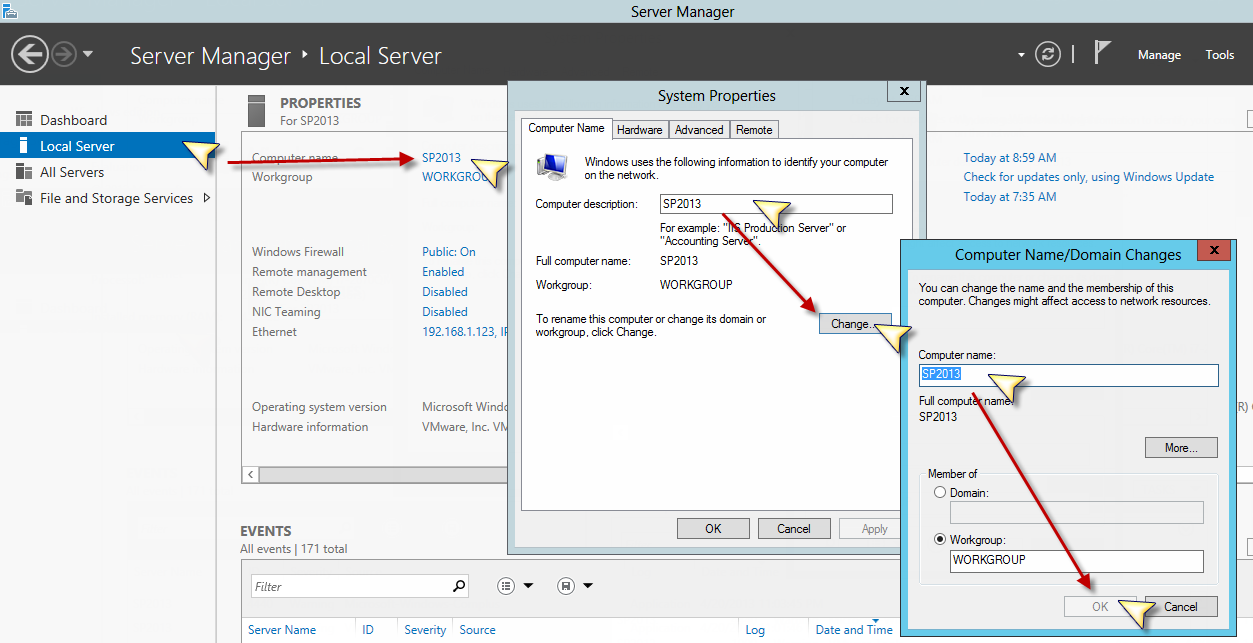
- Remember to rename your windows name to something meaningful.. NOT Something like win-is2xx92243d which is totally making no sense. To configure this, go to Server Manager > Local Server > Click Computer Name > Change > Rename your server and click OK.
- Restart your computer.
- Next, it is always good to set your Server IP address. Though this is not actually required for a Single Box Setup. But good to learn? =)
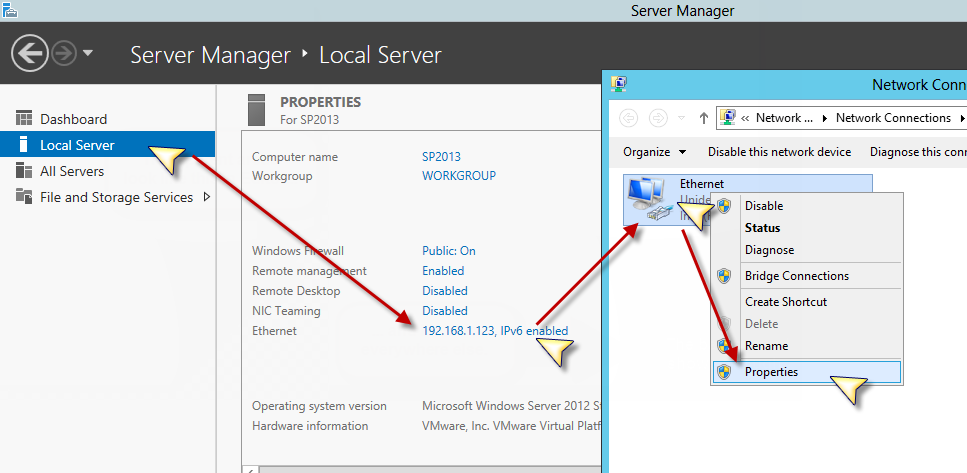 then
then 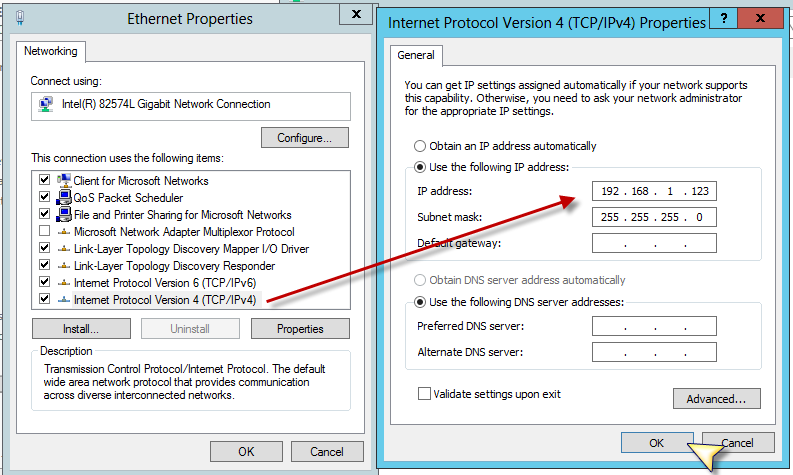
- Next is to setup Active Director Domain Services (AD DS), this is required for you to create services account for sharepoint and sql later on. Note! dcpromo.exe is deprecated for windows 2012. Sadly.
- Kindly go to Server Manager > Dashboard > Add Roles and Features
- Select Role-based or Feature-based installation
- Select your server from the Server Pool list and click “Next”
- Check on “Active Director Domain Services” check box, a prompt up will be displayed. Click “Add Feature”.
- Now, click NEXT all the way down until the installation completed.
Promote Windows 2012 to a Domain Controller
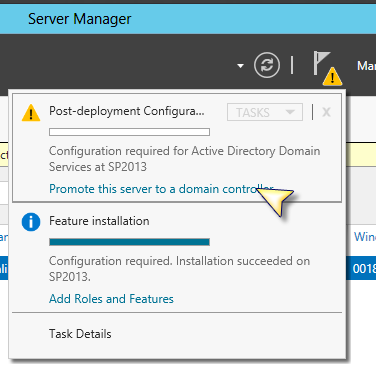
- Once your server 2012 is installed with AD DS, you have to promote your server to a domain controller.
- In the Server Manager, you may notice this Alert icon. Click on it and click on “promote this server to a domain controller”.
- In the “Active Director Domain Services Configuration Wizard”, Select Add a new forest, put your favorite name.
- Click Next, leave the rest default and specify your DSRM Password
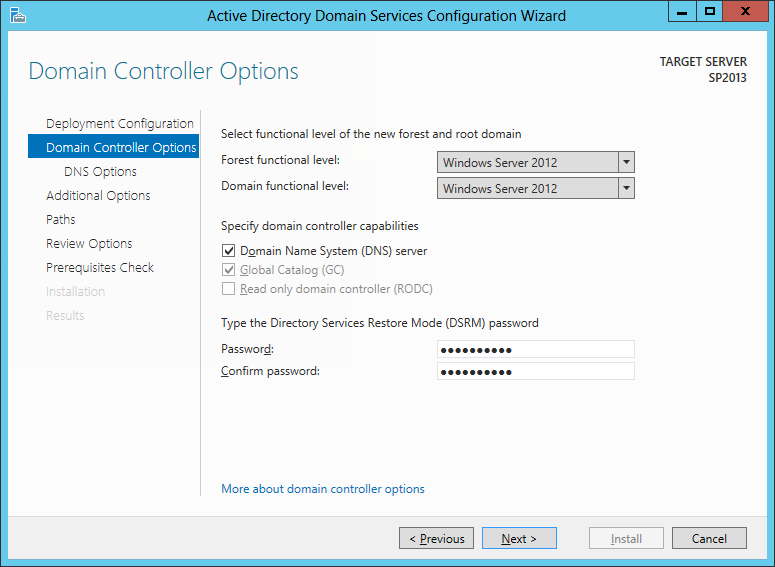
- Click Next all the way down until you see “Install” button. Kindly ignore those warning message. Click Install. Reboot and you are done with DC Promo.
Service Account
- Now that your DC is up, you would need FEW accounts to setup your SharePoint 2013 environment. Note that i did not mention how many account required, because, ultimately, it depends on how segregated you want your farm to be. For Single Box solution and Less Error Prone. You may only need 3 accounts.
- Setup user account
- Server farm account or database access account
- SQL Server service account.
- Refer here and here for the detail account.
- Open Run (Windows + R) then enter “dsa.msc” to open Active Director Users and Computers.
- Right Click your Domain and add a new OU (this is my usual practice to park my sp account into an OU)
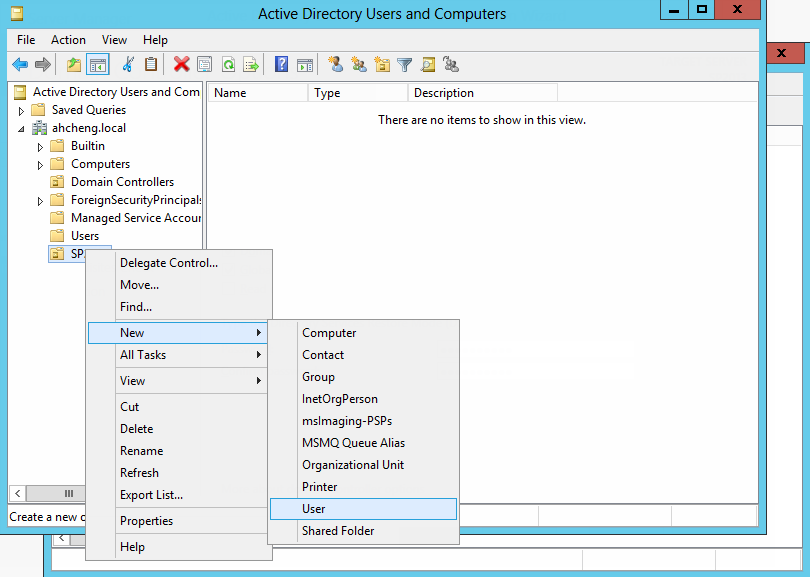
- Add those 3 accounts.
- spsetup
- spfarm
- sqlservice
SQL 2012
- Map your “SQLServer2012SP1-FullSlipstream-ENU-x64.iso” file to vm
- Run the ISO file in your VM, Select Installation Tab on the left and click New SQL Server stand-alone installation or add features to an existing installation.
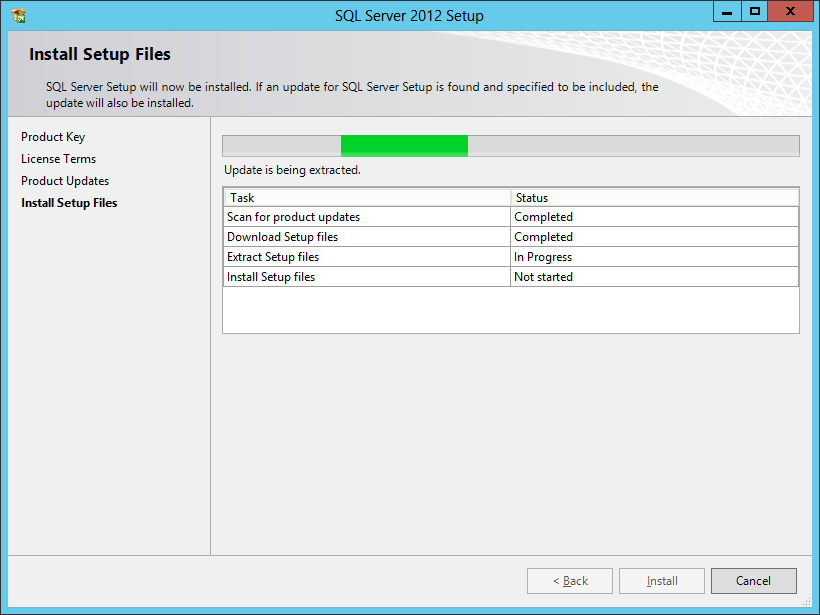
- Click OK after the Setup Support Rules is completed, enter your product key (if you don’t have, use evaluation =D ), click OK. Include SQL Product Updates. Click OK~ These are pretty boring.
- Next, select Role Mode. For evaluation purpose, i select All features with default.
- Name your SQL Instance
- Specify your services account. In my case, i use “SQL Server service account” that i have created previously.
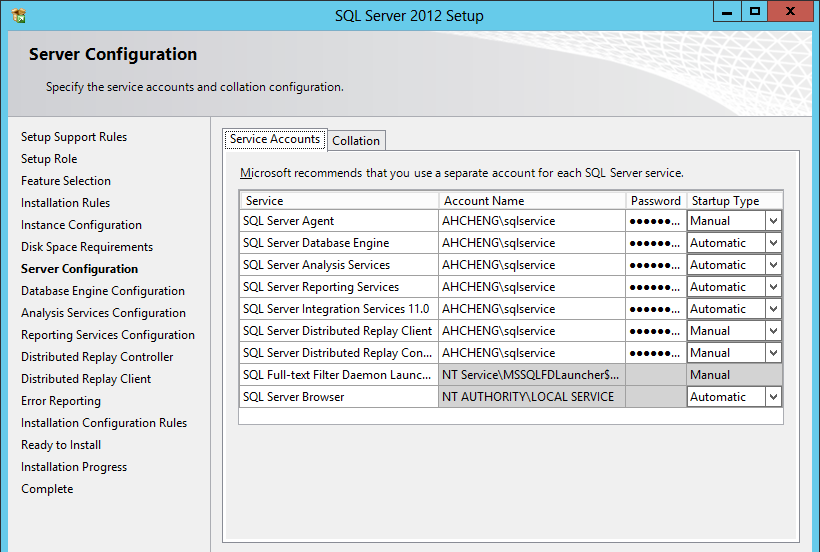
- Specify the Admin Account using the same SQL Server service account. account. (Well, this is for evaluation, you can still opt to use other account)

- Analysis Configuration – Specify the same service account.
- Distributed Replay Controller – Specify the same service account and the Controller Name as your Server Name
- Click NEXT, NEXT, NEXT to install.. go get a coffee and come back after 30 mins…
- ..
- OK~ Next thing is to setup permission for SharePoint Setup Account. Base on the article above. You have to grant the account (In my case “spsetup”) DBCreator and SecurityAdmin permission.
- At this time, your server only allow Windows Authentication mode to access to your Database Engine. Please kindly Grant the SQLService account with Local Administrator right temporary. Log Off and switch to this account.
- Open your SQL Management Studio, Login via Windows Authentication, Right click on the “Login” node and “New Login”
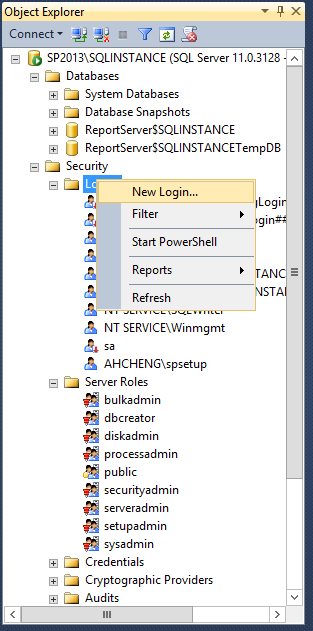
- Select the SharePoint Setup Account “spsetup” and go to Server Roles. Check the 2 server roles “dbcreator” and “securityadmin”
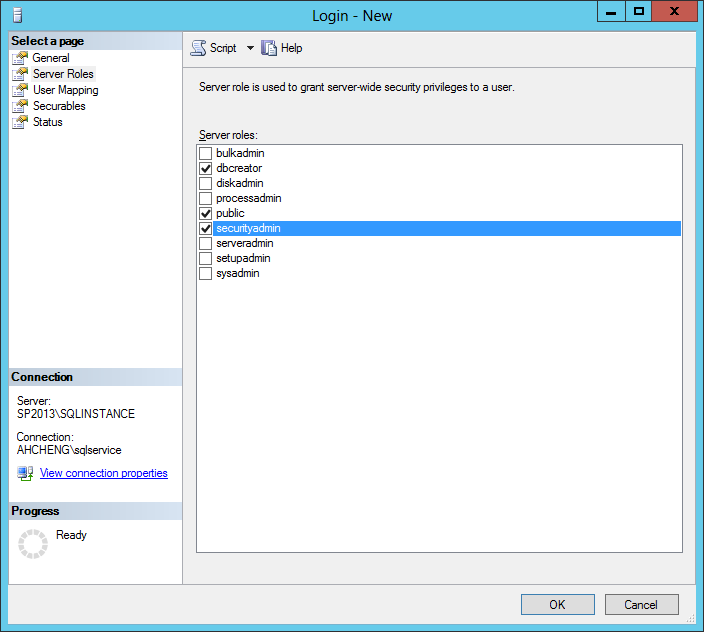
- Click OK to proceed.
- For SharePoint 2013, there is one additional step is to change the Max Degree of parallelism to 1. Go to Database Engine, Right Click and Select Property. Under Advanced panel. Change the value to 1.

- Click OK to proceed. Once this is completed, you may Switch User back to SharePoint Setup Account now (via Alt + Del + Insert) Note: Remove the SQLService account from local admin group once you are done with setting up the permissions.
SharePoint 2013
- Map your SP2013 iso file to your virtual machine (if you haven’t)
- Go into your vm and install SP2013 pre-requisites. The next few steps are for Offline Pre-requisite installation.
- Run Powershell with Administrator rights. Ensure you have executed the following command before Set-ExecutionPolicy RemoteSigned
- Run the following command. Make sure the path is where you store the pre-requisite files. Also, copy the “prerequisiteinstaller.exe” from your SP2013 iso to the same folder where your script is located.
[sourcecode]$SharePoint2013Path = "C:\Prerequisite"
Start-Process "$SharePoint2013Path\PrerequisiteInstaller.exe" –ArgumentList "/SQLNCli:$SharePoint2013Path\PrerequisiteInstallerFiles\sqlncli.msi /IDFX:$SharePoint2013Path\PrerequisiteInstallerFiles\Windows6.1-KB974405-x64.msu /IDFX11:$SharePoint2013Path\PrerequisiteInstallerFiles\MicrosoftIdentityExtensions-64.msi /Sync:$SharePoint2013Path\PrerequisiteInstallerFiles\Synchronization.msi /AppFabric:$SharePoint2013Path\PrerequisiteInstallerFiles\WindowsServerAppFabricSetup_x64.exe /KB2671763:$SharePoint2013Path\PrerequisiteInstallerFiles\AppFabric1.1-RTM-KB2671763-x64-ENU.exe /MSIPCClient:$SharePoint2013Path\PrerequisiteInstallerFiles\setup_msipc_x64.msi /WCFDataServices:$SharePoint2013Path\PrerequisiteInstallerFiles\WcfDataServices.exe"
[/sourcecode] - After running the script, i encountered the following error “The tool was unable to install Application Server Role, Web Server (IIS) Role“
- After 2 rounds of rebooting. The pre-requisite installation is finally done.
- Open the SharePoint Installer Splash Screen and hit Install SharePoint Server.
- Put in the Evaluation Product Key. NQTMW-K63MQ-39G6H-B2CH9-FRDWJ
- Click Next until the installation is completed (yawn..)
- Once the installation is completed, leave the check box default “Run SharePoint Products Configuration Wizard”. Close your installation wizard.
- In the SharePoint Configuration Wizard, click Next.
- System will prompt you to stop the 3 services account, IIS, SP Admin Service, SP Timer Service, click Yes to continue.
- Select “Create a new server farm” and click OK.
- At this point, you may want to setup an ALIAS for SQL connection. (Good practice!)
- Fire Up “Run” and enter “cliconfg”.
- Under Alias tab, enter “sql” name and select “TCP/IP” and your sql server name (basically the same server since we are setting up a single box server.)

- Click OK and exit the CliConfg.
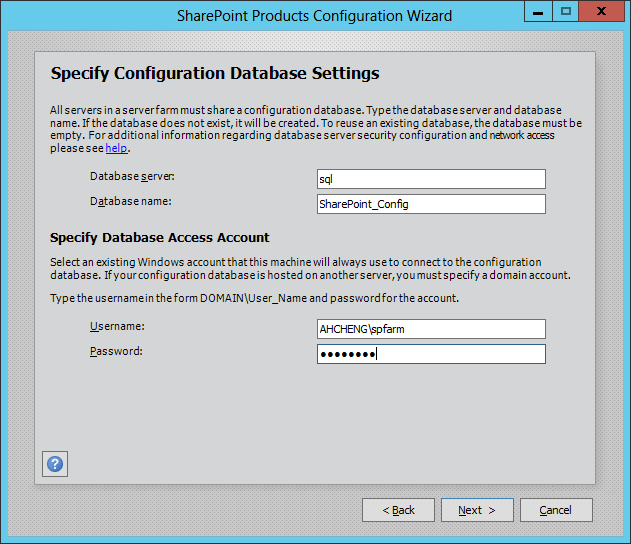
- Back to the SharePoint Product Configuration Wizard, enter the ALIAS that you just created as the SQL name.
- Next, specify the Login ID for “Server farm account or database access account” created earlier. (In my case “spfarm”).
- Specify the passphrase and click Next
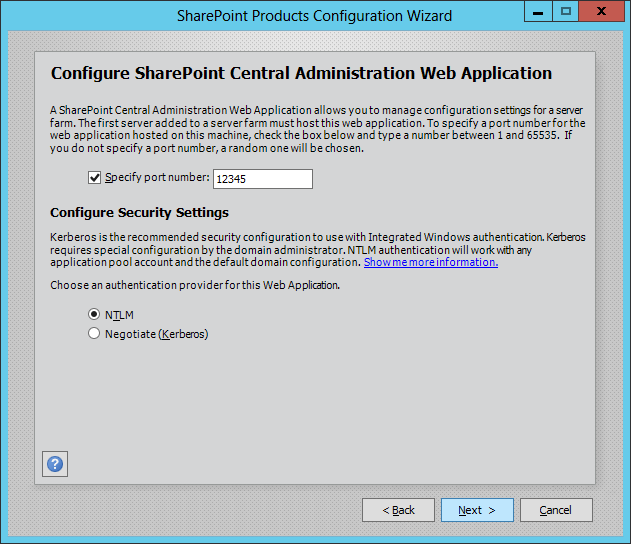
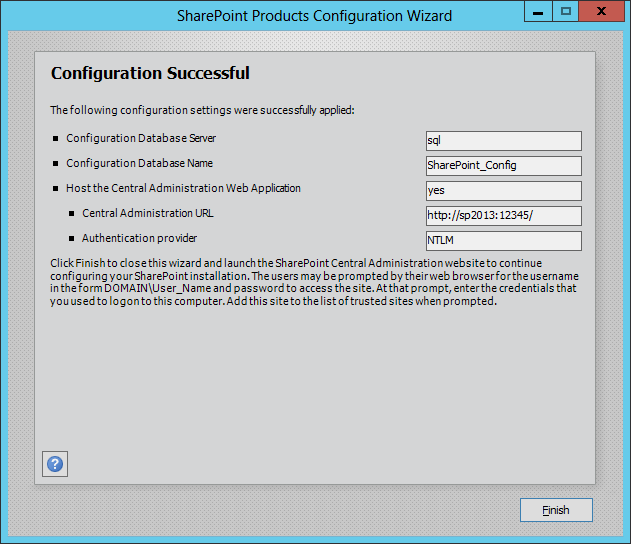
- Specify the Central Admin port number and the authentication mode. Use NTLM for simplicity.
- Click Next to start configuring. Again you can go get some drink and come back like 20 mins time
- Tada~
- If you open your Task Manager, you will noticed that there is one new windows services running “AppFabric Service” which took you 300++mb of RAM. You may actually reduce the RAM usage to make room for other services. Refer here on how to reduce the AppFabric Memory Usage
- Once you close the Product Configuration Wizard, IE will be fired up to performance Configuration. Select all services if you like. Also, you may use a separate service account for the services that you intend to add. I would not recommend turning on Search Service Application as this will take up A LOT OF YOUR MEMORY!!!! Please note. Do it only if you have a lot of RAM in your VM Host.
- The Configuration may take quite some time. It happened to me before that it stuck forever. In case the screen doesn’t refresh or whatsoever, try to open the Central Admin again. The Services will still be created at the backend.
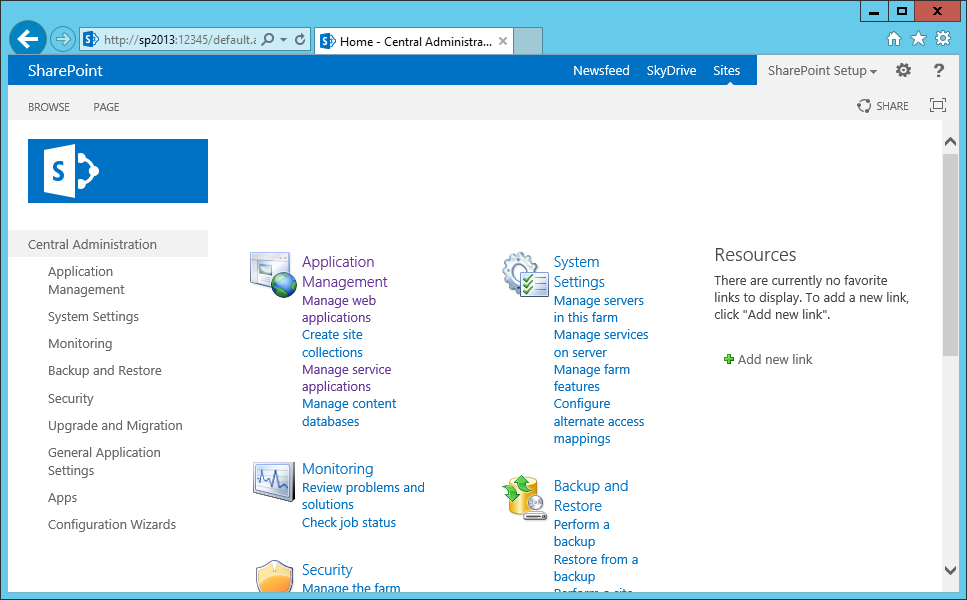
Create Site Collection
- Once the Central Admin is done, you may proceed to create a Site Collection for your primary Web Application – 80
- Click on “Create Site Collection” under Application Management tab.
- Ensure the Web Application is selected correctly. Put in the Name and select your Site Template
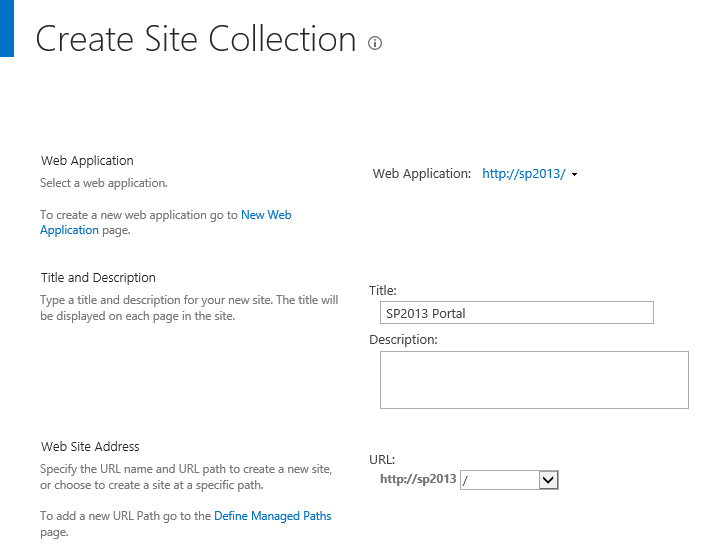
- Specify the Primary Site Collection Admin – AHCHENG\spsetup
- Click OK!!! and Welcome to SharePoint 2013!
Note: If Newsfeed or MySite is having this “We’re almost ready!” error, please kindly check here to add your server as part of cache cluster
Great tutorial. Thanks!
Great article. Thank you!
good job..very much useful..thanq
Thanks very much for putting this up. I’ve followed until setting up SharePoint 2013 step 19. When I click next from that screenshot, I keep getting error saying “Cannot connect to database master at SQL server at sql. The database might not exist, or the current user does not have permission to connect to it.” I’ve searched online, but couldn’t find a solution that works. Has anyone else had the same problem? Help please, I’ve been stuck for 3 days now.
are you using \”spsetup\” account to log in to your Server when running SharePoint Configuration Wizard? The account that you are using to setup must have the database permission stated in SQL step 15 Select the SharePoint Setup Account “spsetup” and go to Server Roles. Check the 2 server roles “dbcreator” and “securityadmin”
Yes, tried that account with that permission as well as other accounts, None of them worked. Did it work for you? I tried to use the spsetup account to login to SQL using SQL authentication, couldn’t do it. I don’t know if it has anything to do with it?
Think your SQL is not setup properly. The steps above use Window Authentication mode rather than SQL Authentication.
You may check whether your SQL Instance is running. Go to SQL Server Configuration Manager. Under “SQL Server Services”, make sure your SQL Instance Is running.

Thanks very much. I’ve been trying to do this for sometime now, until now i’ve not got a clean install. This was smooth. Thanks.
@Manoj
Glad it helped !
such a nice clean step wise installation Blog is this.. very much useful for me… Great work..
Would you mind sharing the specs of the virtual machine you installed this on?
Thanks!
Hi Robert,
Below is my laptop spec which was used for the setup:
Intel(R) Core(TM) i7-2670QM CPU @ 2.20GHz
Ram: 8GB
Hard Drive: WDC WD5000BPVT-24HXZT3 ATA Device
It should be fine if you are SharePoint Admin. If you are for development, i would suggest you try installing into servers instead. The times taken to App Pool reset or code deployment can really kill you.
Hello Ah, many thanks for the step by step instructions on setting up a Sharepoint development environment and before i give it a try, i’m wondering what will happen to the overall setup when one of the trial versions expire? ie will i be able to reinstall an expired component? or will have to buy a license for that expired component? and i’m basing this question on a write up from another similar post, ie:
2.For SQL Server 2012: Unfortunately there’s no way to rearm a SQL Server Evaluation license. You will have to convert it to a retail license. The way to do that is to:
A.Run the SQL Server setup
B.Click on the maintenance tab
C.Click on “Edition upgrade”
D.Follow the steps till you reach the product key screen and enter your product key (usually pre-filled if a licensed installation media is used)
E.You can read a good set of instructions for converting your eval license to a full license here: http://www.mssqlgirl.com/upgrading-from-sql-server-2012-evaluation-edition.html
Thanks again Ah!
Thank you for the great tutorial. I am noticing that a lot of SP2013 configuration options (i.e. create new web application; add new user to the Farm Administrators group; others) are either greyed-out or unavailable. Items in the ULS logs indicate that the user account I’m using doesn’t have ‘Local Administrator’ permissions, but the local administrator group is no longer available on the domain controller. Have you experienced this, and is there a way to resolve these issues?
Great work.
I found this just when I was thinking of investing time this weekend to figure out how to setup a working SharePoint environment.
This is a great timesaver
Thanks for that
Best guide I\’ve used for a dev VMware. No fluff,,, just al you need to know. Cheers
Did you create this VM on your laptop with Windows 8 OS?
windows 7
Thanks Ah ! Then it must be Windows 7 64 bit? And I think this VM(with Sharepoint 2013 and Windows server 2012) will work only on Windows 8 OS.
My reason of asking this is that I am planning to buy a laptop but not sure what should be the configuration to run sharepoint 2013. Any comments would be much appreciated.
I am planning to run SharePoint 2013 VM on Windows 8 64 bit OS.
Hmm. A VM with Windows 8 and SharePoint 2013. I have not tried that… Please share if you manage to setup one! =)
Please note that my Host (Laptop) OS is Windows 7 64bit but the VM itself can be Windows Server 2012 or Windows 8 (if you prefer)
Your worry should be whether VMWorkstation works on Windows 8 OS (the OS of your laptop). VMWorkstation is supported in Windows 8, check http://www.vmware.com for your own reference. And You can install any Virtual OS you want for the SharePoint 2013.
This was the laptop spec:
Intel(R) Core(TM) i7-2670QM CPU @ 2.20GHz
Ram: 8GB
Im suggesting you to get more RAM, you may go for 16GB.
No, I meant I am planning to run VM(which will have SP2013) on Windows 8 OS. I know we cant install Sp2013 on Windows 8 client OS.
Finally, I got Intel Core i7-4700MQ with Windows 8.1 16GB RAM
i did every thing but same still error IIS on prerequisite 🙁 i am scraching my head from last 10 days and did not get success yet to install sharepoint 2013 my laptop acer 5741g with 8 gb ram core i5 and i did every thing what you said in this tutorial but still same result
please help me if some one could make a installation video share it on youtube with fix of IIS error
Thanks
Hi Cheng,
Thanks for sharing your knowledge on SP along with screenshots.I have installed SP 2010 in my pc.My PC has below configuration:
Core 2 Duo 2.7 GHz Processor
10 GB Ram with Windows 7 Professional
1 TB HDD
I created a Standalone VM for SP 2010 and allocated 4 GB Ram in VM Ware settings but still the VM is response is slow.Please Advise optimize settings for better response.
Thanks in Advance.
Sunil
Hi AH Cheng
Can I use Windows server 2012 R2?
Hi Hossein, Yes you can.
But please note that if you are using Windows 2012 R2, You need SP2013 Installer with SP1 slipstream. Else you will bump into PreRequisite Error and could not install SP2013 at all.
I ended up creating an SharePoint Farm environment using VMWare Player on my Windows 8.1 Host using the inputs from your blog.
http://tanveerkhan-sharepoint.blogspot.com.au/2015/06/creating-sharepoint-farm-environment.html
Great! And Welcome to SharePoint 2013!
Thanks for taking the time to do this, it saved me a LOT of time.